

otxo online manual
Table of Contents
Getting started
Controller compatibility
OTXO is made for Novation® Launchpad® controllers. A lot of care has been put into making sure it is compatible with all models. The following models have been thorougly tested:
- Launchpad S
- Launchpad X
- Launchpad Mini
- Launchpad Mini mk3
- Launchpad Pro
- Launchpad Pro mk3
If you have multiple Launchpads, the suggestion is to use a non-velocity-sensitive one for OTXO first, that way you can keep using a velocity sensitive one for drums, notes expression.
DAW setup
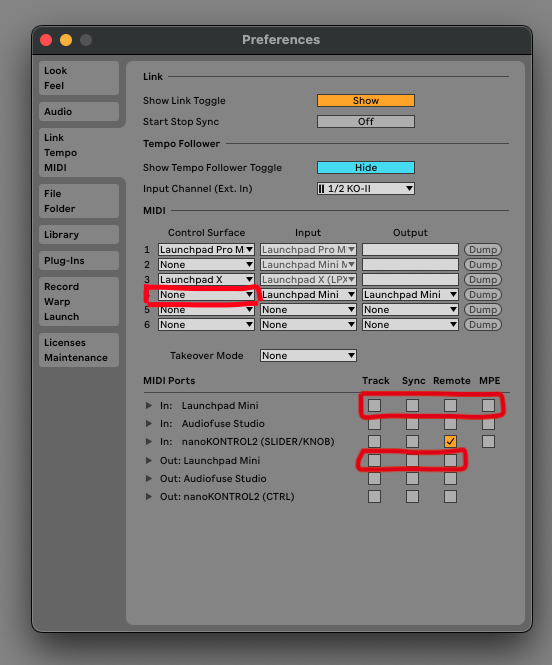
It is important to tell your DAW is not to "interfere" with OTXO's communication with your selected Launchpad controller. The way you do that in Ableton is in the MIDI preferences, you select "None" in the leftmost column ("Control Surface") for your Launchpad. The second and third column should stay as is. Then, under "MIDI Ports", uncheck everything for the launchpad that you are using, both input and output.
Using the controller
General
On the Launchpad controller that you use for OTXO, the top row of 8 buttons are used as Pages that control various aspects of the looper and its 8 internal tracks.
- Play page
- Control page
- Length page
- Length Factor page
- System page (last button in row)
On the Play and Control pages, the rightmost column of 8 darker buttons function as the record/play/overdub button for each respective track.
For this manual, operation is explained with schematic drawings of the first models of Launchpads. For any compatible model, the operation is the same, including the Pro models: top row is pages, right column is record buttons.
To clear all recorded loops on all tracks, press the rightmost Page button on the top row, and then press the top right lighter square button right under it (the button should be lighting up in red).
Play
The Play page lets you see the playheads of each track going from left to right, looping around and thus visualizing what is going on. Each track's playhead color on the controller can be green, yellow, or red, according with its status as just playing, recording in overdub mode, or recording in overwrite mode respectively. Pressing one of the square buttons in an already playing track lets you move the playhead to that section of the loop (in that track) instantly. On the far right, the round buttons will toggle recording on and off per track.
Control
The Control page lets you see and set various settings per track that relate to your live performance or inspiration capturing session in the studio. Mute or solo tracks, set their recording mode, or reset tracks.
Length
The Length track allows you to see and set the length of each track in relation to the master BPM (this could be a free length track within OTXO, or your DAW's BPM). The buttons, from left to right, span from 1/16th note to 8 bars, each step to the right doubling the length. The round button on the far right sets that track's length to "Free", which means that it will record until you press record again.
You can double the length of a recorded loop by holding the lit-up button representing the current length, and while holding, pressing a button to the right of it.
Length Factor
The Length Factor page lets you deviate from standard power-of-2 length differences between tracks. It does this by letting you select a numerator and a denominator for the fraction to multiply the length with that is set in the Length page for the track in question. For an example, please refer to the tooltips below.
System
The System page lets you quickly do a full reset/clear of the looper, as well as toggle monitoring, toggle track output, and left/right channel configuration options.
Tips & Tricks
Note that you can hold a page button, press something in it, and let go of the page button as a sort of shortcut. You will be taken back to the page that you were on before pressing the shortcut.